

Posted by Happy Home Shopping Guyana
on October 09, 2026

A thorough clean starts with treating each part of your vegetable chopper appropriately. Food caught around a blade or in a narrow crevice can be hard to remove, so it’s natural to wonder how to clean a vegetable chopper without risking a cut or damaging the tool. Rinsing permitted parts soon after chopping helps keep scraps from drying in place. Knowing what to wash, how to handle sharp parts, and what to dry separately matters too.
Cleaning instructions vary by design, so check the care guidance for your chopper before immersing any part or using a sponge near a cutting edge. This guide walks you through a careful routine for loosening residue, cleaning accessible crevices, handling blades safely, and drying and storing each part. Whether you’re caring for a Yusshn 12 IN 1 Vegetable Chopper or another model, you’ll find practical steps for leaving your tool clean and ready for the next meal.
Key Takeaways
- Before cleaning, remove leftover food with a utensil and keep your fingers away from cutting edges.
- For how to clean a vegetable chopper, follow its care instructions and wash only the parts they permit.
- Use a soft brush to loosen scraps in small spaces rather than scraping toward your hands.
- Soak parts only when their care instructions allow it, and use a gentle approach for lingering smells.
- Dry each cleaned part fully before reassembling or storing the chopper.
Why cleaning a vegetable chopper properly matters
A clean chopper makes the next meal more pleasant to prepare. There’s no old onion smell or dried scraps to remove, and less chance that yesterday’s residue will affect the taste or texture of fresh ingredients. A thorough clean means checking the food-contact surfaces and accessible components, not just rinsing the most visible area.
Small crevices around cutting parts can hold bits of vegetables even when the chopper looks clean at a glance. Scraps become harder to remove once they dry, and ingredients such as onion or garlic can leave noticeable odours. Cleaning soon after use makes it easier to spot and remove residue before putting the tool away.
Cleaning also supports sensible food handling. Tools used with different ingredients can carry visible remnants from one task to the next, so clear them before switching foods. Broad food safety principles include keeping food-contact items clean. For a chopper, that means checking the surfaces that touched ingredients and removing leftover pieces.
Choppers aren’t all built alike, so generic advice can’t replace the care instructions for your model. A part that can be washed on one chopper might need different treatment on another. Use the product guidance to decide whether to immerse, rinse, or wipe each component. This is especially useful when learning how to clean a vegetable chopper with an unfamiliar design.
Which parts of a vegetable chopper need attention?
Check the cutting parts, food-contact surfaces, and any supporting base or other non-cutting components. Some designs allow pieces to come apart, while others keep them fixed in place. Identify the parts first, then follow the instructions before disassembling anything. This helps you check where residue may collect without pulling apart components that are meant to stay assembled.
When should you clean a vegetable chopper?
Clean it after each use, while food residue is still fresh and easier to clear. If you’re preparing more than one ingredient, remove visible scraps before switching, especially when the first ingredient has a strong flavour or smell. This quick reset also helps you notice food caught in less obvious places. Keep the routine simple: clean after use, then dry fully. Make that your final step before storing the chopper.
Prepare your vegetable chopper for safe cleaning
A little preparation makes cleanup steadier and helps you avoid reaching blindly near a cutting edge. Before adding water or picking up a brush, check how your chopper is assembled and what its care instructions allow. Manual and powered models may need different handling, and removable parts vary by design.
Use this quick checklist before cleaning:
- Read the care instructions to see how parts should be removed, washed, or kept dry.
- If the chopper is powered, switch it off and unplug it before cleaning.
- Identify which parts are designed to detach and which should remain assembled.
- Use a utensil to lift out leftover food, keeping your fingers away from cutting edges.
- Choose cleaning tools and products suitable for the parts you’re washing.
Clearing loose pieces first makes it easier to see which surfaces and crevices need attention. It also helps prevent scraps from being pushed farther into a joint as you clean. Good kitchen habits, including keeping utensils clean and limiting residue between ingredients, are covered in the FDA food safety guidelines. Use the same careful approach as you prepare your chopper for washing.
Check the instructions and identify removable parts
Look over the chopper before taking it apart. Note which components are designed to detach, and leave fixed pieces in place. Check the model-specific guidance for water exposure, suitable cleaning products, soaking, and dishwasher use. Don’t assume a part is safe to immerse or put in a dishwasher just because it comes off. Follow the instructions for your exact model.
For the Yusshn 12 IN 1 Vegetable Chopper, use the product instructions for model-specific cleaning decisions, including whether parts can be removed, soaked, or washed in a dishwasher.
Handle cutting parts without rushing
Keep the cutting edge pointed away from your hands as you work. If a cutting component has a handle or non-cutting area, hold it there rather than gripping the blade. Use a utensil to dislodge visible food. If residue needs brushing, use a soft brush only when it’s suitable for that component. Don’t scrape toward your fingers or force a part loose if it doesn’t detach easily.
Take your time. Knowing which pieces can be handled and how to hold them makes the next steps in how to clean a vegetable chopper clearer and safer. For a practical kitchen tool for meal preparation, explore kitchen essentials from Happy Home Shopping Guyana.
How to clean a vegetable chopper step by step
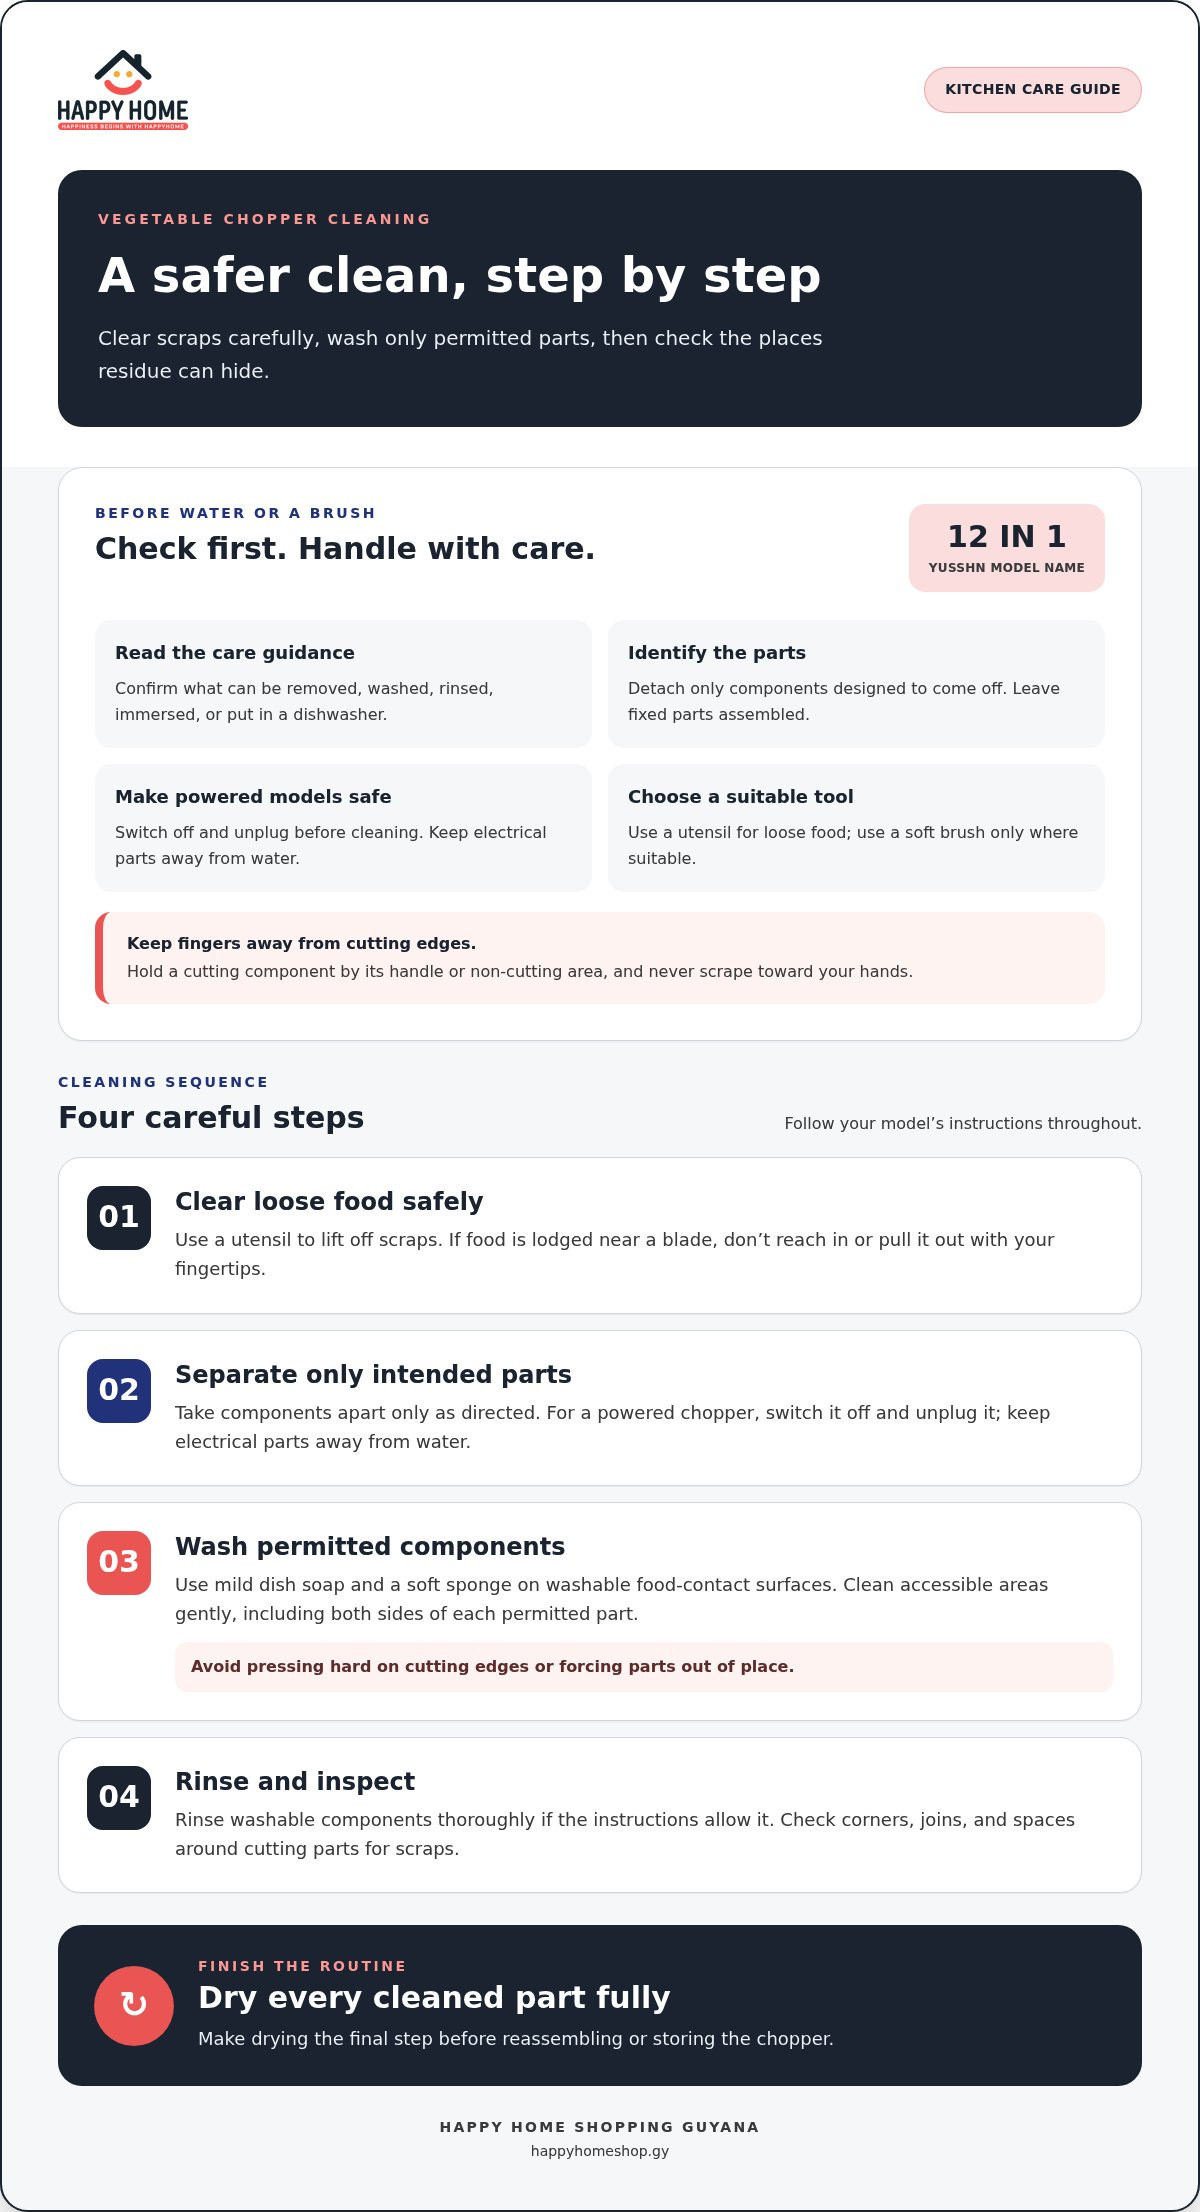
Follow these steps for a careful, thorough clean. First, use your chopper’s care instructions to confirm which components can be washed, immersed, or placed in a dishwasher. The method depends on the design, so wash only the parts the instructions permit.
- Clear loose food safely. Keep fingers away from cutting edges and use a utensil to lift off scraps. If food is lodged near a blade, don’t reach in or pull it out with your fingertips.
- Separate only the intended parts. Take apart components only as directed. If the chopper has a powered base, switch it off and unplug it before cleaning. Keep electrical parts away from water.
- Wash permitted components. Use mild dish soap and a soft sponge on washable food-contact surfaces. Clean accessible areas gently, including both sides of each permitted part. Don’t press hard on cutting edges or force parts out of place.
- Rinse and inspect. Rinse washable components thoroughly if their instructions allow it. Check corners, joins, and spaces around cutting parts for scraps. If you spot residue, clean the area gently before moving on.
- Clean any base as directed. If the care instructions permit wiping a base that must not be immersed, use a damp cloth. Keep moisture away from electrical parts, controls, and openings on powered models.
Wash washable components without damaging them
Clean accessible food-contact surfaces with soap and water, but don’t assume every part can be submerged. Follow the product instructions for each component. A soft brush may help with a narrow crevice when it’s suitable for that part. Use light strokes rather than pressing hard or scraping across an edge. Gentle cleaning lifts residue without bending or stressing components.
Thorough cleaning is a useful everyday kitchen habit. Michigan State University Extension food safety advice discusses cleaning kitchen tools and surfaces as part of preventing cross-contamination. For your chopper, check the areas that touched food, especially when cleaning between ingredients.
Clean the base and hard-to-reach areas carefully
Not every chopper has a separate base, and not every base should get wet. Follow the model’s instructions. If a non-immersible base may be wiped, use a damp cloth rather than running it under a tap. On powered models, avoid wetting electrical parts. Before drying, inspect corners and joins where small scraps can remain.
This step-by-step routine makes how to clean a vegetable chopper easier without treating every model alike. Once you’ve checked for remaining food and rinsed only the permitted parts, dry and store everything according to the product’s care guidance.
Remove stuck food and deal with lingering smells
A rinse may not shift every scrap, especially if a piece of vegetable has lodged beside a cutting edge or dried in a narrow join. Take a calm, targeted approach rather than reaching in or scrubbing harder. The chopper’s care instructions come first: they determine whether a part can be soaked and which cleaning methods are suitable.
What to do when food is stuck near the blade
Stop before trying to remove the trapped piece, and keep your hands clear of the blade. Use a suitable soft brush or utensil to ease the food out, moving away from your fingers. If the instructions allow soaking that particular part, a brief soak may help loosen dried residue before brushing. Never force or bend a blade to reach a scrap, and don’t use a tool that could damage the component.
Work patiently around the spot instead of pushing food deeper into a crevice. If it won’t come free with gentle pressure, check the product instructions for a recommended cleaning method. Not every component should be soaked, so don’t leave the assembled chopper or an individual part in water unless its care guidance permits it.
How to freshen a chopper without harsh cleaners
If an odour remains after cleaning, look for hidden food first. Check accessible food-contact areas, corners, and joins. Wash permitted parts again with mild dish soap and water, then rinse them thoroughly so no loosened scraps or soap remain on surfaces that touch food. Inspect the parts before drying them.
Onion or garlic can leave a noticeable scent, but a stronger cleaner isn’t automatically the answer. Avoid mixing cleaning chemicals, and don’t apply bleach, vinegar, abrasive powders, or other harsh products unless the manufacturer’s instructions specifically allow them. Mixing products can create hazardous fumes, and an unsuitable cleaner may affect a component. A careful second wash is a sensible first step when ordinary residue or smells linger.
If a smell persists, check again for residue in places you can safely access. Don’t disassemble parts in a way the instructions don’t allow. If the odour seems to come from a component you can’t reach or clean as directed, follow the maker’s guidance rather than pouring liquid into gaps or using a sharp object to scrape them.
Simple care helps keep meal preparation pleasant, whether you’re cleaning a chopper you already own or choosing a kitchen tool. Explore the Yusshn 12 IN 1 Vegetable Chopper at Happy Home Shopping Guyana.
Dry, reassemble, and store your vegetable chopper
A careful clean isn’t finished until every washed part is dry and safely put away. Moisture can linger in a narrow join or around a cutting component, so check each piece before reassembling or storing it. Follow the product’s care instructions to learn which parts can be towel-dried, how the chopper should be reassembled, and how its cutting parts should be stored.
Let each part dry before putting the chopper away
Depending on the care guidance, let permitted washable parts air-dry or use a clean towel. Pay attention to crevices, joins, and areas where water may collect. If a part still feels damp or you can see moisture, give it more time before assembly. A powered model’s base may need different treatment from washable components, so follow its instructions.
Reassemble the chopper only as directed and when the relevant parts are fully dry. If its instructions call for components to be stored separately, keep them apart rather than forcing the tool back together. Store cutting parts securely, with blades covered or otherwise away from casual contact, while following the product’s storage guidance.
Rinse permitted parts, dry them fully, and store blades safely. This routine helps keep the chopper clean and ready for another meal. It also gives you a final chance to spot moisture or leftover food before putting everything in a cupboard or drawer.
Make cleanup part of an easier meal-prep routine
Cleaning soon after use makes the task easier because food residue is less likely to dry in place. Build it into your meal-prep rhythm: finish chopping, clear and wash the parts allowed by the care instructions, then dry them before putting the chopper away. That small habit helps make the next round of cooking feel more organised and keeps cleanup from becoming a bigger job later.
For a Yusshn 12 IN 1 Vegetable Chopper, use the product instructions for model-specific washing, drying, reassembly, and storage. The same general routine can complement ideas for mastering meal prep with a 12-in-1 chopper, while the care guidance for your own tool remains the source for its specific requirements.
For a more practical home-cooking setup, explore kitchen tools for home cooking at Happy Home Shopping Guyana.
Make a little care part of your kitchen rhythm
A well-cared-for chopper can make everyday meal preparation feel smoother, especially when it’s ready to use without dried scraps or lingering smells. Keep the product instructions close at hand and let them guide your routine. The best approach to how to clean a vegetable chopper is one you can follow consistently and safely, not one based on guesswork.
As you plan your next meal, think about which kitchen tools make preparation easier. The Yusshn 12 IN 1 Vegetable Chopper is available from Happy Home Shopping Guyana, an online store serving customers across Guyana.
Explore the Yusshn 12 IN 1 Vegetable Chopper and make it part of your next meal-prep routine.
Frequently Asked Questions
Can you put a vegetable chopper in the dishwasher?
Put parts in the dishwasher only if the care instructions for your specific chopper say they’re dishwasher-safe. That guidance may apply to some components but not others, so don’t assume the whole tool can go in. Check whether the instructions specify rack placement, too. If they don’t recommend dishwasher cleaning, hand-wash the permitted parts instead.
How often should you clean a vegetable chopper?
Clean your chopper after every use, and clear visible scraps before changing ingredients during the same cooking session. For example, removing bits of garlic before chopping a mild vegetable can help keep flavours from carrying over. If you pause meal preparation, don’t leave food sitting in the chopper until it dries. Follow the product instructions each time you clean it.
Can I soak a vegetable chopper to remove dried food?
Soak a part only if its care instructions allow it. Check the guidance before putting any component in water, and don’t soak an assembled tool or a powered base unless the instructions explicitly permit it. If soaking isn’t allowed, use a suitable soft brush or utensil to loosen residue gently. Avoid forcing food out with a sharp object.
How do I clean a vegetable chopper blade without cutting myself?
Keep your fingers away from the cutting edge and use a utensil or suitable soft brush to remove food. If the blade component is designed to detach, follow the instructions and hold it by a handle or non-cutting area, with the edge pointed away from you. Don’t rush or grip the blade itself. For a powered model, unplug it first.
How do I get rid of a smell in my vegetable chopper?
Check accessible food-contact areas for hidden scraps, then wash permitted parts again with mild dish soap and rinse them thoroughly. Onion or garlic residue can linger in a small join even after a quick rinse. Don’t mix cleaning chemicals or use vinegar, bleach, or abrasive products unless the manufacturer allows them. Make sure parts are fully dry before storing.
Can I wash the base of a vegetable chopper under running water?
Don’t rinse a base under running water unless its product instructions specifically say that it’s safe. A base may contain electrical parts, so keep water away from openings, controls, and connections. If the instructions permit wiping it, use a damp cloth instead. For a powered chopper, switch it off and unplug it before cleaning, then follow its care guidance.
